CMPS-3480 Computer Graphics
Summer Lab-1
Overview:
This lab will prepare you for many elements of the course.
Parts of this assignment will count toward your lab-1 assignment
when the semester starts.

This is not the complete assignment yet. More parts will be added.
This is to get you started.
Step 1:
Please do these steps to prepare...

1. Log into Odin, using the -YC option.
   example: ssh myname@odin.cs.csub.edu -YC

2. Change to your /3480/1 folder.
   cd 3480/1

3. Copy the lab files now...
   cp /home/fac/gordon/p/3480/code/summer_1/* .

   Your goal is to find and run the sum1.cpp program.

3. Compile and run the program:
   make
   ./sum1

4. Press the '1' key.
   You will see a yellow dot in the corner of the window.
   Press '1' again to erase the dot.

   The key-presses are processed within the program code.
   Go look for it.
   Look through the C++ code.


If you can't see the dot, right-click and view image.


Next, you will add code to the sum1.cpp program.
If you can't see the dot, right-click and view image.
Next, you will add code to the sum1.cpp program.
Step 2:
Add code so that pressing the '2' key will
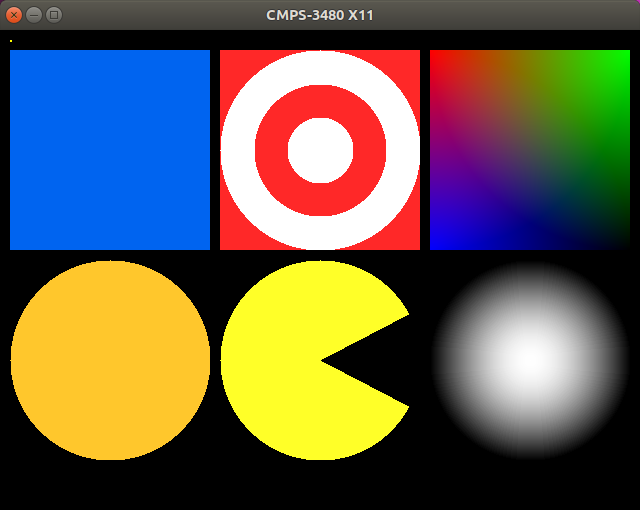
draw a blue square just below the dot.
 hint: use nested for-loops.
Here is how you can draw the square simply and correctly.
This code belongs in the render function.
Set the color to blue, then loop through a square area 200 x 200 pixels.
The upper-left corner of the square is at xy coordinates 10, 20.
if (g.state[2]) {
x11.set_color_3i(0, 100, 240);
for (int i=0; i<200; i++)
for (int j=0; j<200; j++)
x11.drawPoint(j+10, i+20);
}
This is the code in its simplest form.
You must also modify the check_keys function.
Here is one way to do it...
case XK_2:
g.state[2] ^= 1;
render();
break;
hint: use nested for-loops.
Here is how you can draw the square simply and correctly.
This code belongs in the render function.
Set the color to blue, then loop through a square area 200 x 200 pixels.
The upper-left corner of the square is at xy coordinates 10, 20.
if (g.state[2]) {
x11.set_color_3i(0, 100, 240);
for (int i=0; i<200; i++)
for (int j=0; j<200; j++)
x11.drawPoint(j+10, i+20);
}
This is the code in its simplest form.
You must also modify the check_keys function.
Here is one way to do it...
case XK_2:
g.state[2] ^= 1;
render();
break;
Step 3:
Add code so that pressing the '3' key will
draw a gold circle (disc) just below the square.


You may use the official CSUB blue and gold colors if you want.
Go look for them on the web.
You will find some RGB values for our school colors.


hints on how to draw the disc...

Draw the gold disc just like you were drawing a square, but skip the
pixels that are outside of the disc radius.

The radius of your disc is half-way across the square.

For every pixel drawn,
   Check the distance from the pixel coordinates to the disc center.
   If the distance is within the radius, draw the pixel, else don't draw.

To find the distance from one point to another...
   find the horizontal difference and vertical difference (with subtraction)
   square both of those, then add them together
   take the square-root of the sum
   that is the distance
   compare it to the radius

There could be other ways to draw the disc.

Do not modify the X11_wrapper class.
Use only the drawPoint function.
You may use the official CSUB blue and gold colors if you want.
Go look for them on the web.
You will find some RGB values for our school colors.
hints on how to draw the disc...
Draw the gold disc just like you were drawing a square, but skip the
pixels that are outside of the disc radius.
The radius of your disc is half-way across the square.
For every pixel drawn,
Check the distance from the pixel coordinates to the disc center.
If the distance is within the radius, draw the pixel, else don't draw.
To find the distance from one point to another...
find the horizontal difference and vertical difference (with subtraction)
square both of those, then add them together
take the square-root of the sum
that is the distance
compare it to the radius
There could be other ways to draw the disc.
Do not modify the X11_wrapper class.
Use only the drawPoint function.
Step 4:
Add code for keys 4, 5, 6, and 7.
Choose one or more of the new objects, and try to render them.
 How to do each one...
Key-4 Target logo
The Target logo requires choosing between multiple colors in an image.
This is actually an exercise in rendering a ring object.
Multiple radii should be checked using conditional statements.
It requires about 3 more lines of code added to the gold-disc.
Key-5 Pacman
The pacman requires you to calculate an angle based on coordinates.
How to calculate the angle of each pixel drawn...
1. subtract the disc center coordinates from the pixel coordinates
x = pixelx - centerx
y = pixely - centery
2. use the atan2 function
angle = atan2(y,x)
3. adjust the angle
the angle will be a value between -pi and pi
that is a range of 2pi
make the angle positive
angle = angle + 3.14159...
the angle will have a value between 0 and 2pi
4. convert radians to degrees
this will make it easier to draw a precise pacman
degrees = (radians / 2pi) * 360.0
5. check each pixel to see if it falls within a 55-degree range
the range you choose will determine where the pacman mouth will be
Key-6 Color gradient
This is an exercise in RGB color. Red, Green, Blue color.
Draw a square like in key-#2 object.
Control the color of each pixel based on its distance from the corners.
The pixel in the upper-left is all red { 255, 0, 0 }
As you move to the right, it gets less red and more green.
red green
+---------------+
| |
| |
| |
| |
| |
| |
| |
+---------------+
blue
Key-7 Lighting of a sphere
This is a gray-scale image.
Choose just one value, and set the 3 color components to that value.
Example of gray colors:
{ 0, 0, 0 } black
{ 255, 255, 255 } white
{ 185, 185, 185 } gray
{ 21, 21, 21 } dark gray
To achieve the shading, use the pixel distance from center.
1. Normalize the distance from center so that the far edge of the disc
is at a distance of 1.0. The center has a distance of 0.
Normalization requires a divide by the length.
The length is the radius, which is 100 units, like the gold disc.
2. Scale the normalized distance by pi.
Scaling is done with a multiply.
This new value relates to the angle at that spot on the sphere.
3. Lighting is done by finding the Cosine of the angle to the
light source. So use the cos() function on the value.
4. This final value is the indensity of the light at that spot.
Use that intensity as the value for your gray-scale color.
Scale it up to a max of 255. (scaling means multiply)
It might help to look up diffuse or Lambertian shading.
How to do each one...
Key-4 Target logo
The Target logo requires choosing between multiple colors in an image.
This is actually an exercise in rendering a ring object.
Multiple radii should be checked using conditional statements.
It requires about 3 more lines of code added to the gold-disc.
Key-5 Pacman
The pacman requires you to calculate an angle based on coordinates.
How to calculate the angle of each pixel drawn...
1. subtract the disc center coordinates from the pixel coordinates
x = pixelx - centerx
y = pixely - centery
2. use the atan2 function
angle = atan2(y,x)
3. adjust the angle
the angle will be a value between -pi and pi
that is a range of 2pi
make the angle positive
angle = angle + 3.14159...
the angle will have a value between 0 and 2pi
4. convert radians to degrees
this will make it easier to draw a precise pacman
degrees = (radians / 2pi) * 360.0
5. check each pixel to see if it falls within a 55-degree range
the range you choose will determine where the pacman mouth will be
Key-6 Color gradient
This is an exercise in RGB color. Red, Green, Blue color.
Draw a square like in key-#2 object.
Control the color of each pixel based on its distance from the corners.
The pixel in the upper-left is all red { 255, 0, 0 }
As you move to the right, it gets less red and more green.
red green
+---------------+
| |
| |
| |
| |
| |
| |
| |
+---------------+
blue
Key-7 Lighting of a sphere
This is a gray-scale image.
Choose just one value, and set the 3 color components to that value.
Example of gray colors:
{ 0, 0, 0 } black
{ 255, 255, 255 } white
{ 185, 185, 185 } gray
{ 21, 21, 21 } dark gray
To achieve the shading, use the pixel distance from center.
1. Normalize the distance from center so that the far edge of the disc
is at a distance of 1.0. The center has a distance of 0.
Normalization requires a divide by the length.
The length is the radius, which is 100 units, like the gold disc.
2. Scale the normalized distance by pi.
Scaling is done with a multiply.
This new value relates to the angle at that spot on the sphere.
3. Lighting is done by finding the Cosine of the angle to the
light source. So use the cos() function on the value.
4. This final value is the indensity of the light at that spot.
Use that intensity as the value for your gray-scale color.
Scale it up to a max of 255. (scaling means multiply)
It might help to look up diffuse or Lambertian shading.
All of these exercises are useful and require you to learn something new.
Any of the 4 described could be expanded into a semester project.
Extra:
Anti-aliasing of the gold disc.

Use key-8 for this exercise.

Key-8 Anti-aliasing

Anti-aliasing in this case means visual smoothing of a jagged edge so that
it looks better and looks smoother and softer.

Disc with aliasing...


Disc with anti-aliasing...


How to do it...

First of all, when 8 is pressed, just draw the disc in the same location that
the original gold disc was at.

This assumes your disc radius is 100 units.

1. Check the distance of a pixel. If within 99 of the center, draw the pixel.

2. If the distance is between 99 and 100 units, adjust the color of the pixel.
   Scale the gold color between gold and black depending on the distance
   from 99.0 to 100.0.

   Maybe like this...

   Distance is 99.25

   It's within 100, so there is some color.

   intensity = radius - distance

   red *= intensity
   green *= intensity
   blue *= intensity

   set_color (red, green, blue)

   draw_pixel(x, y)


With general anti-aliasing, we would combine the object edge color with
the background color. In this case the background is black so the
color adjustment is simple.
How to do it...
First of all, when 8 is pressed, just draw the disc in the same location that
the original gold disc was at.
This assumes your disc radius is 100 units.
1. Check the distance of a pixel. If within 99 of the center, draw the pixel.
2. If the distance is between 99 and 100 units, adjust the color of the pixel.
Scale the gold color between gold and black depending on the distance
from 99.0 to 100.0.
Maybe like this...
Distance is 99.25
It's within 100, so there is some color.
intensity = radius - distance
red *= intensity
green *= intensity
blue *= intensity
set_color (red, green, blue)
draw_pixel(x, y)
With general anti-aliasing, we would combine the object edge color with
the background color. In this case the background is black so the
color adjustment is simple.